Quantcast
Channel: Barbara Lewis : torch-fired enamel
Viewing all 78 articles
Browse latest View live

White is White ... Except for When It's Not!

$
0
0
Thompson Enamel produces 9 different white enamels, which gives the enamelist some nice variety.  So, if you're looking for a more translucent white, you can find that with 1040.  If you're looking for a very opaque white, you can find that with 1055 and 1060.  But, if you're looking for one of my favorites, you'll find that with 1020, which is also very opaque.

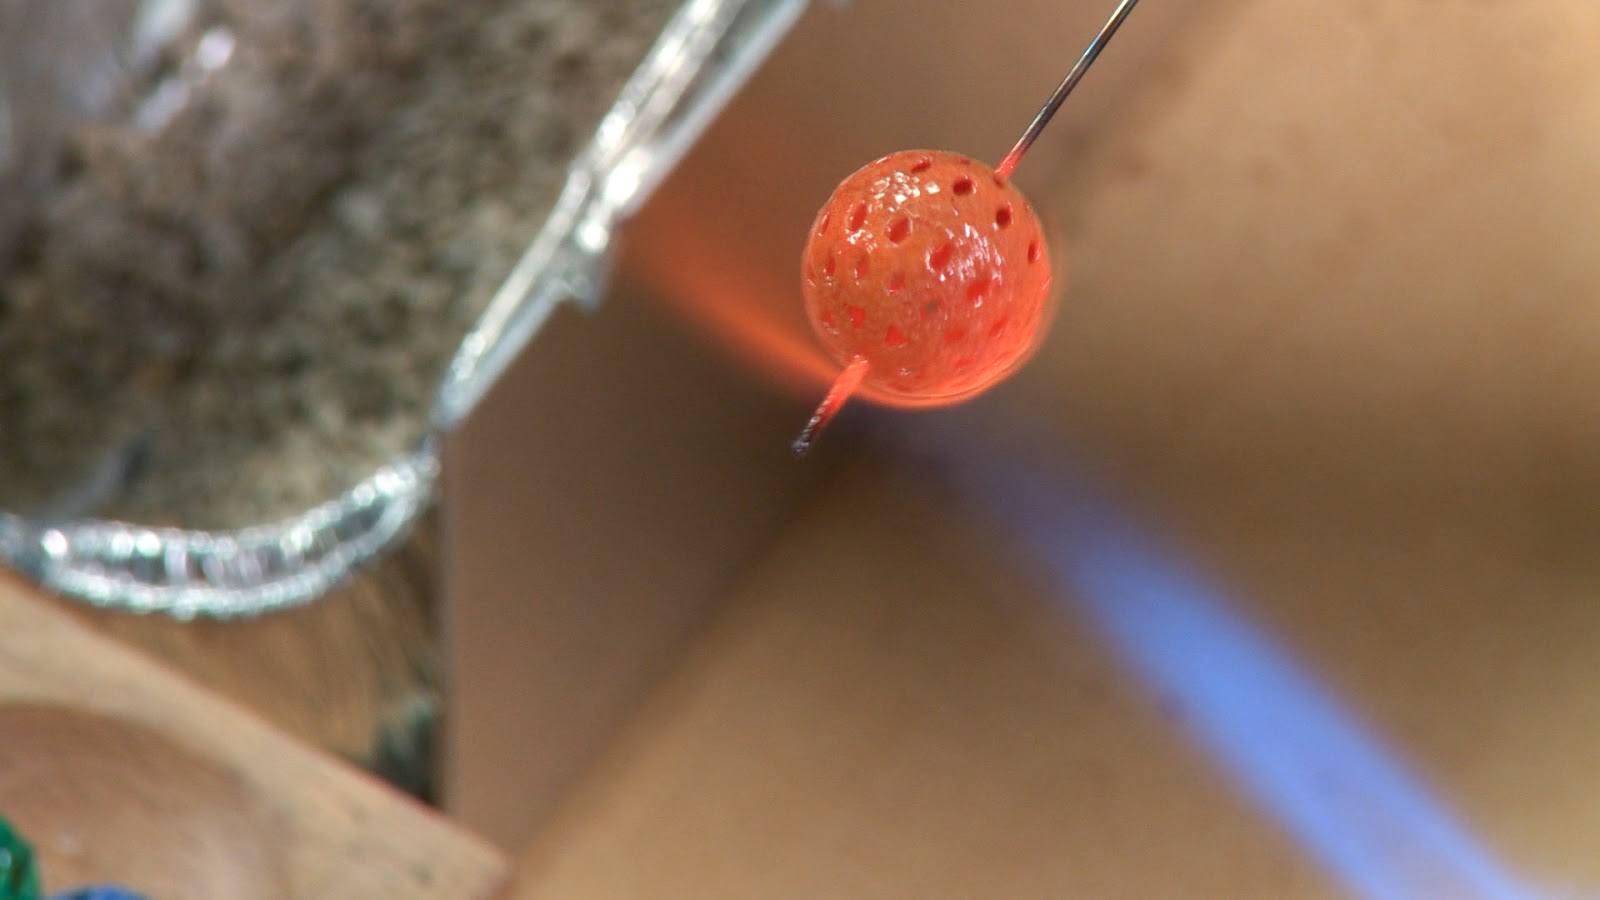
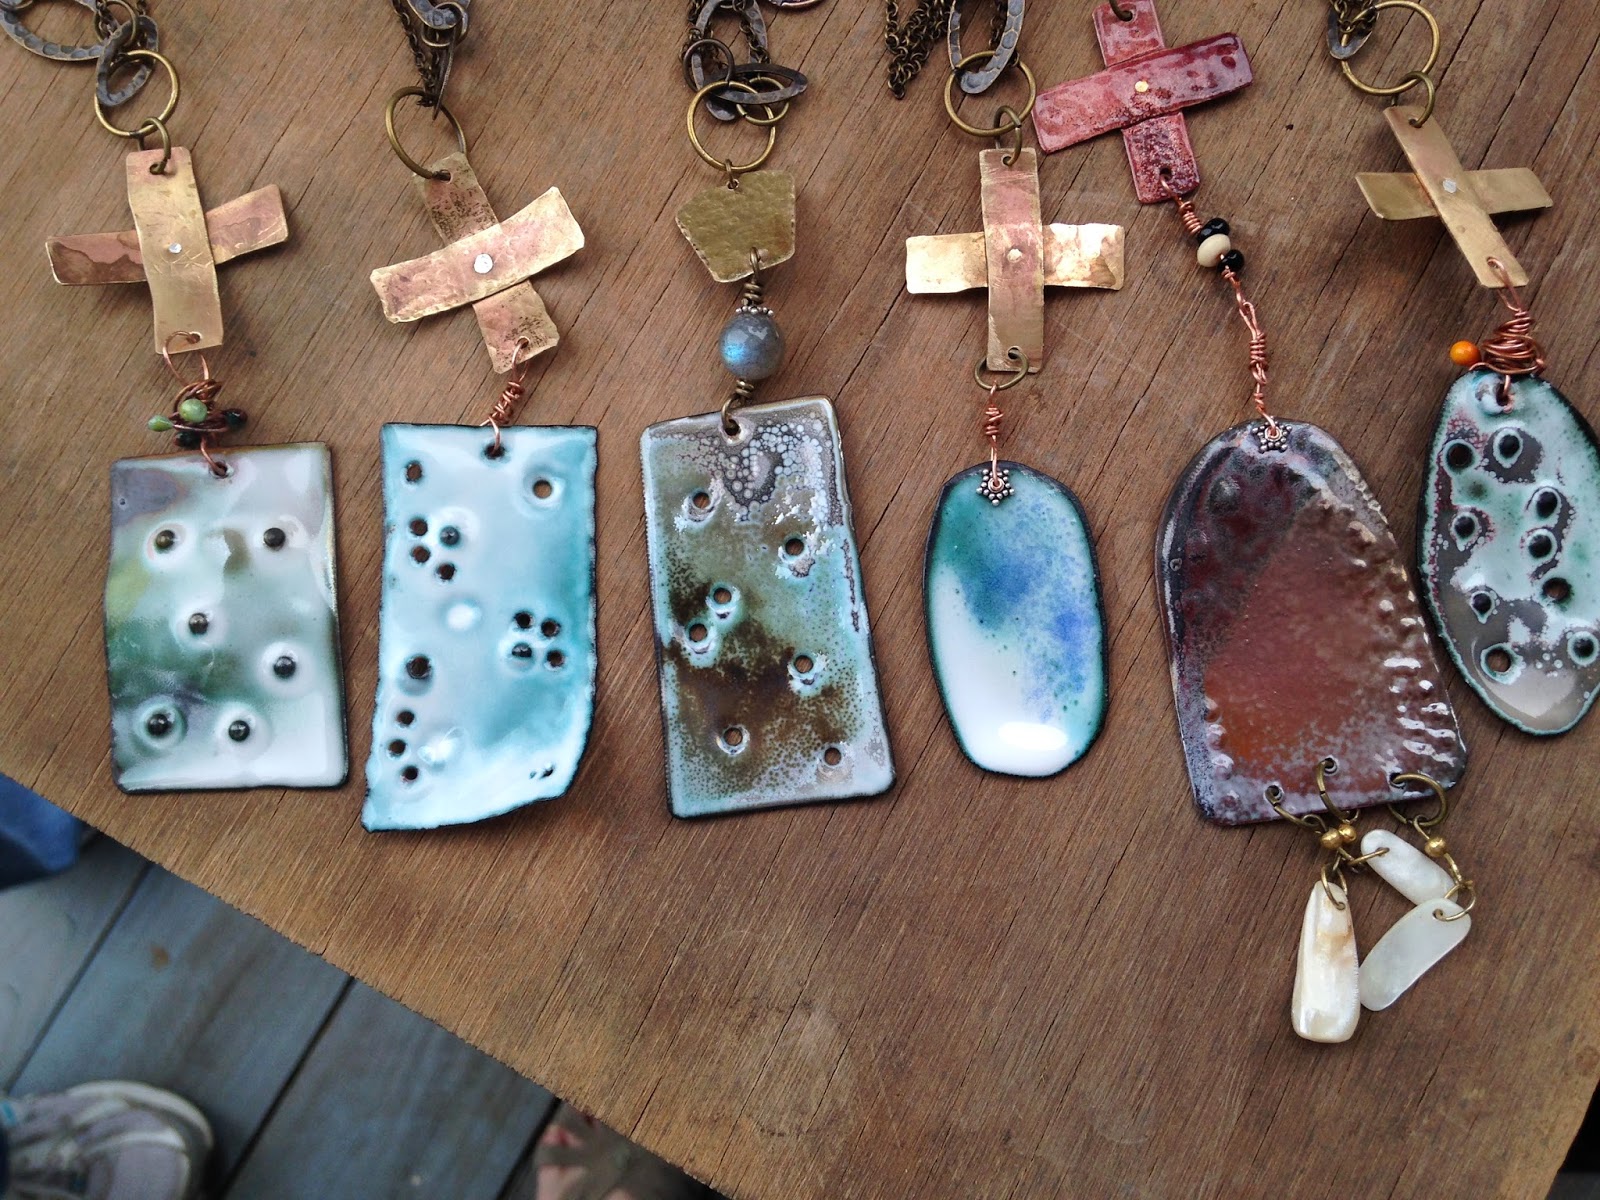
While I like 1055 and go to it often, I find 1020 to be much more reactive to copper when torch-firing the enamel.  To me this means that with just a little over-firing, you can get gorgeous blue-green freckles peeking through the surface of the white enamel.  If you've got a big lampworking torch like I do, I can over-fire enamel all day for special effect, with very little effort.  If you have a smaller torch, the fact that 1020 is so reactive will make a big difference.

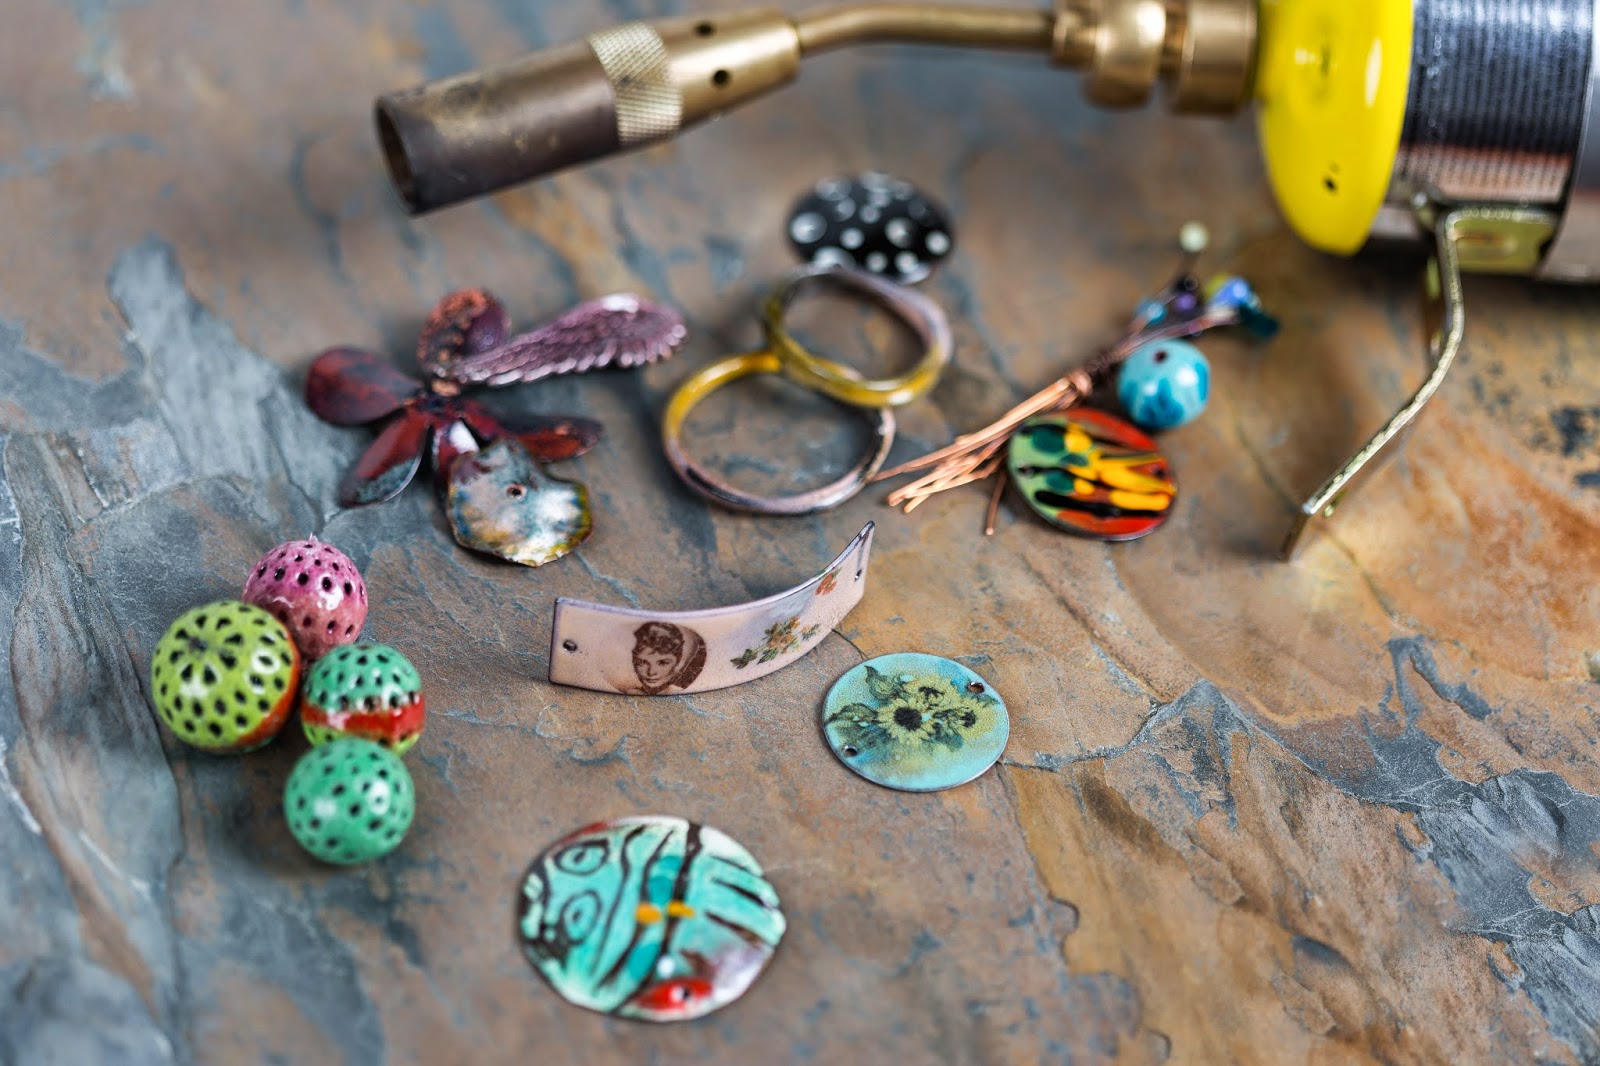
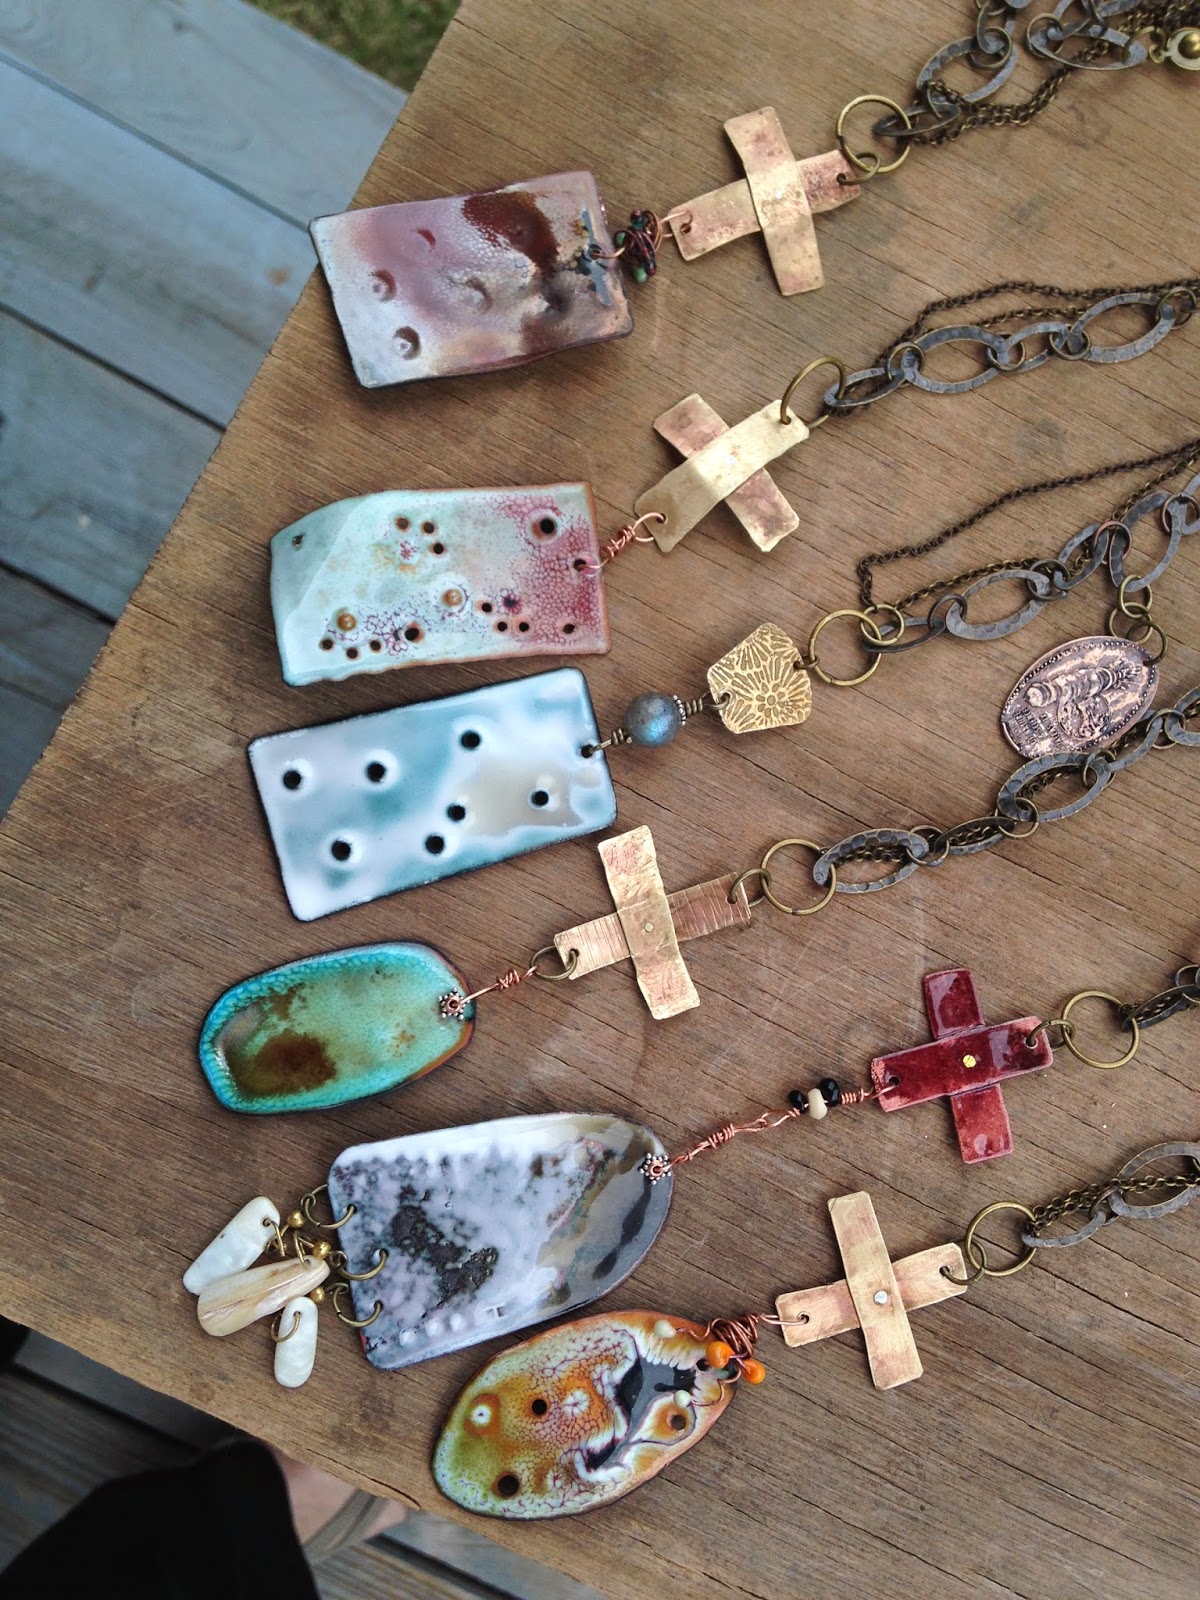
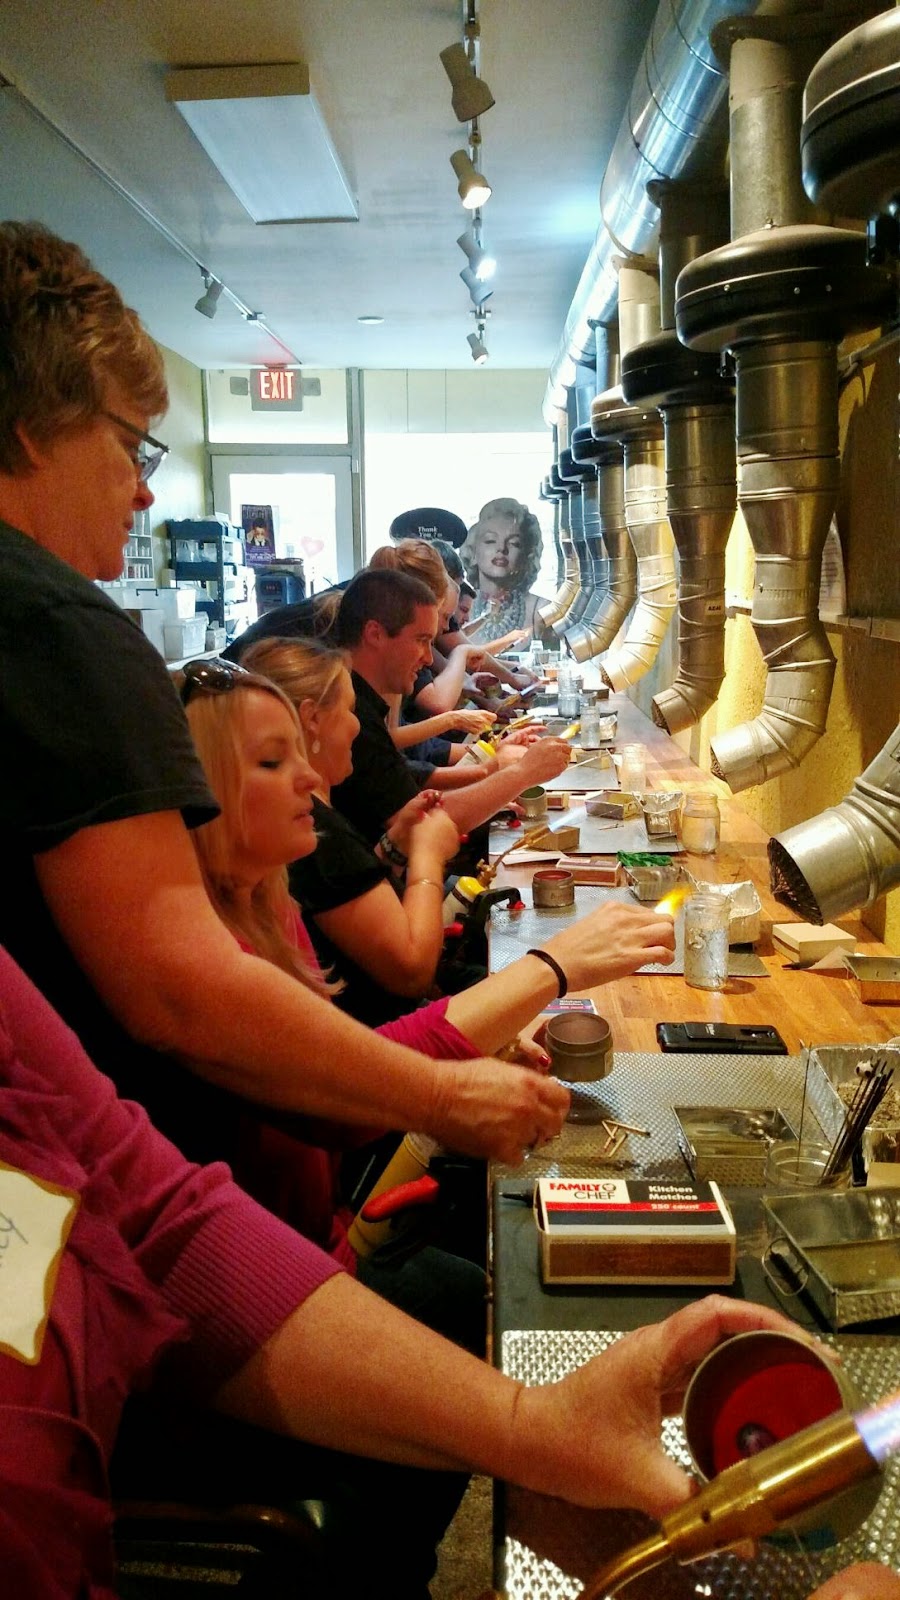
Today I took a break from packing for Art Retreat on the Prairie to play with some Titanium White.  Here are the results ...


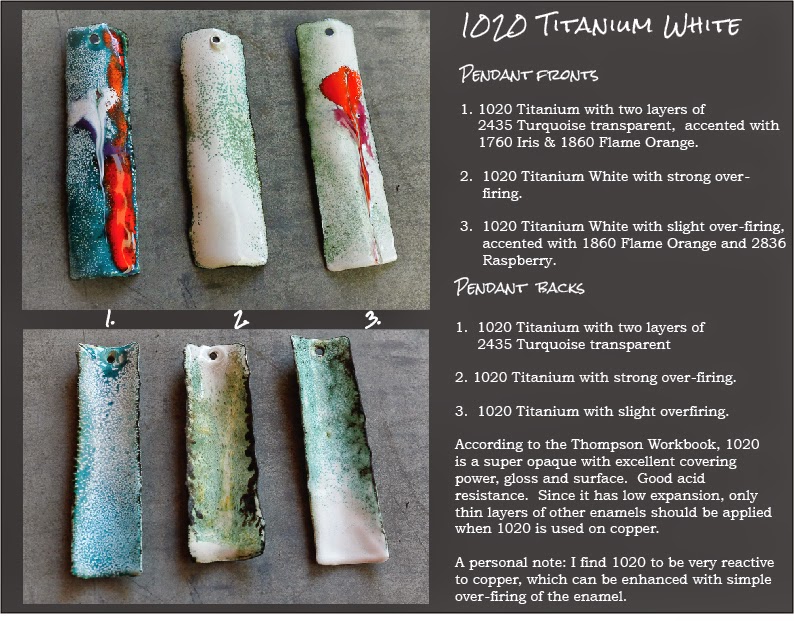
I really got into decorating #1.  You know the old joke, "How many artists does it take to do a painting?  The answer is "two." One to do the painting and the other to shoot him when he's done." Yes, it's easy to continue to play with color because it's so addictive! 

#2 was simply several layers of 1020.  When you over-fire enamel, it pulls away from the edges, leaving you a rusty, crusty frame around the piece ... which I LOVE!  This piece is sans decoration now, but will probably get a ceramic decal!  

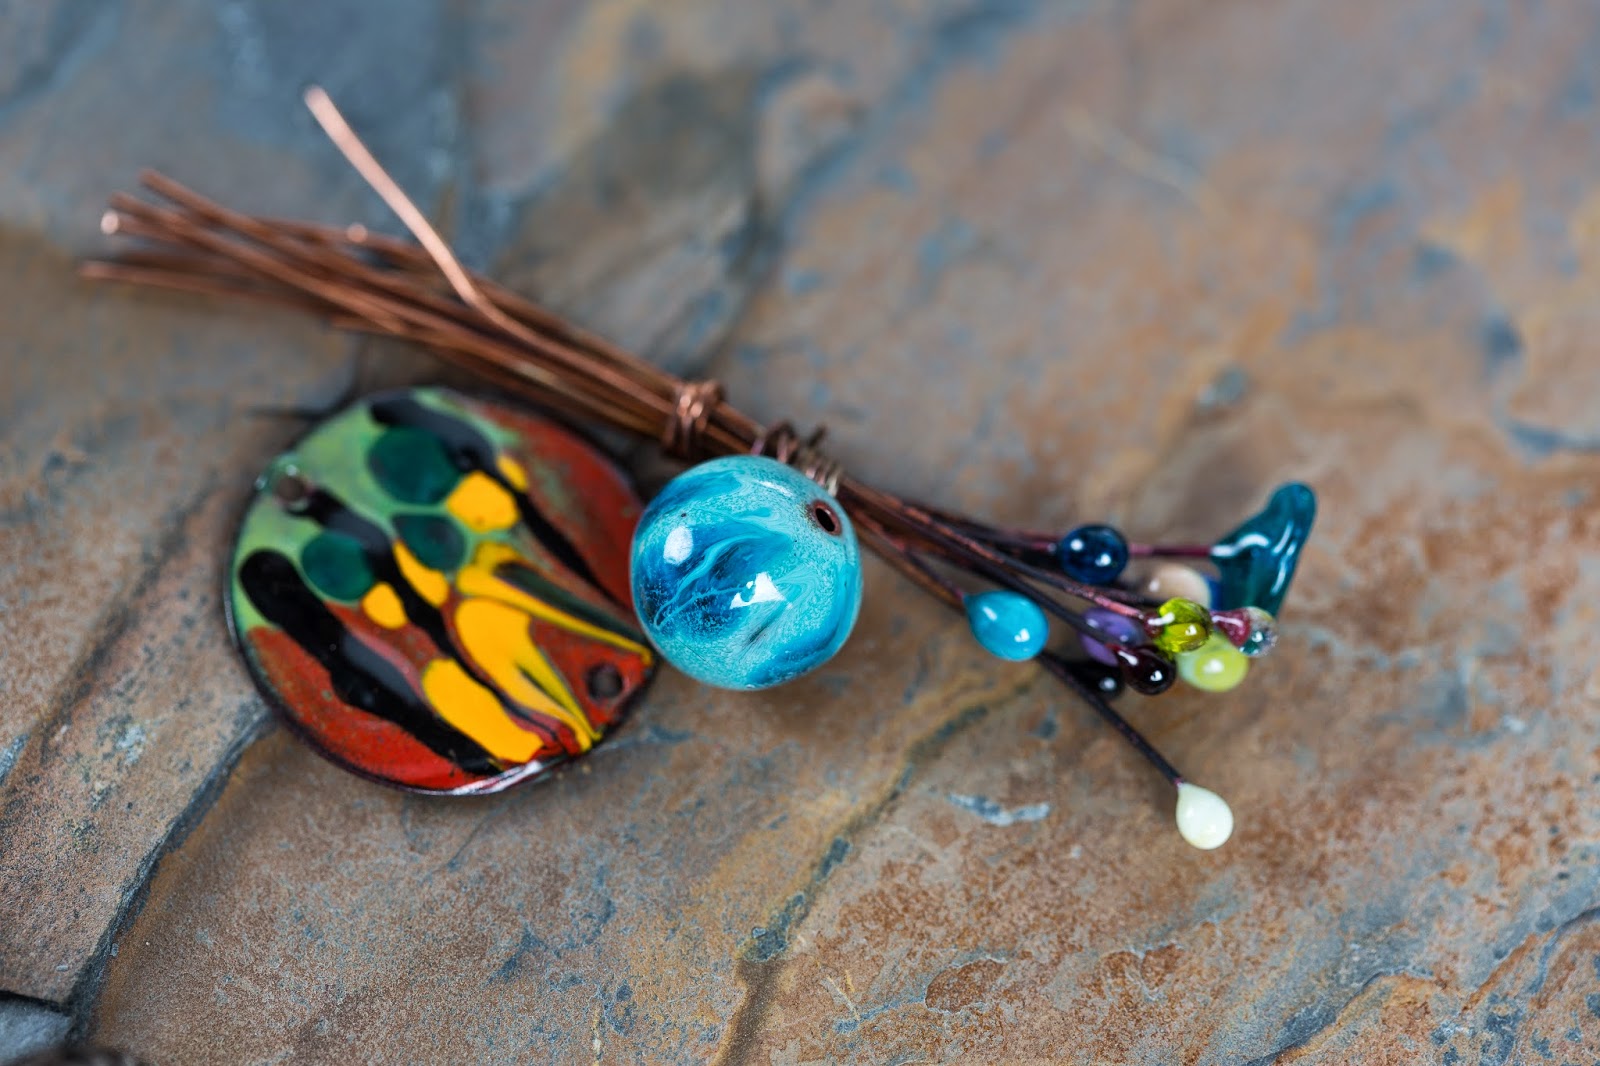
#3 is given the same firing technique, but is decorated with Flame Orange and Raspberry (transparent).  

Speaking of 2836 - Raspberry ... if this is one of your favorite colors, please know that it is currently unavailable and will not be available for AT LEAST a month.  There are issues with the availability of the ingredients that go into make the glass.   Now for the shameless plug ... We have some in stock

One of the perks of being a Thompson Enamel distributor is knowing what's available, what's in the pipeline, and what's dried up like a cracked river bed ... at least temporarily. 

Craftsy launch Tuesday, November 4!

$
0
0
How would you like to work in a place like this?

photo: Craftsy

Yes, there are people who actually have jobs like this ... over 200 of them!  It's in a place called, "Denver," which has the distinction of being a "mile high" up in the sky and to being home of Craftsy where you can ...

photo: Craftsy 

I learned of Craftsy in July when an email appeared in my inbox announcing a class. What caught my eye was their great graphic artwork!  I went to the site and thought, "Hey, what's this?" The wheels started turning and before long I was sending a email saying, "Wouldn't you like to offer an enameling class?"  A few days later came a response, "Of course we would!"

The detail to which Craftsy produces a class is like nothing I've ever experienced before.  I had two lengthy conversations with Grace, their acquisitions editor, where we discussed the content of the class.  I submitted a formal class proposal backed-up with photographs. A contract was signed and I was passed off to my producer, Amana.  

Over the few weeks, Amana and I talked on the phone for 4 hours, going over the class outline.  Because I was teaching in Denver in late August and the filming was scheduled for mid-September, Amana came and spent several hours observing the workshop and reading my first book.  Her intent, before filming, was to know as much about my topic as a student leaving a workshop.  She sure accomplished her goal.

What I guess I'm trying to say is that Craftsy's preparation through all phases of the class development, starting with their interactions with the instructor,  insures that you have a great learning experience.  


photo: Craftsy

The launch of the class is Tuesday, November 4.  Please visit my blog every day until then because I'll be posting more information about my experience, what you can expect to learn in my class, and information about the learning powerhouse known as "Craftsy!" And, guess what?  We'll be having a class giveaway!  So, come back for the next episode ... "Craftsy: How it All Began."

So what's in the Craftsy class, you ask?

$
0
0
"A lot!" would be the answer!  Take a look at what we'll cover ... 

photo:  Craftsy


Lesson 1: 
We're going to start with learning all about the different types of enamels (transparent and opaques, 6/20 enamels, threads, etc.), the types of metal you can use, including how to shop for brass, the setting up of your workstation, assembling the torch & safety tips, lighting and using your torch. 

photo: Craftsy


Lesson 2:
I'll introduce you to enameling iron beads,  how to troubleshoot your results, how to blend transparent enamels to create new and exciting colors, how to create a tri-colored bead. 

photo: Craftsy


Lesson 3:
We'll work with steel wire to create a gorgeous link: form it, how to fire a larger piece, and the importance of flame annealing.

photo: Craftsy


Lesson 4: 
Now we'll use some of the decorative enamel supplements,  like 6/20 and enamel threads,  on copper and also create round head pins and flower head pins. 

photo: Craftsy


Lesson 5:
We're on to enameling brass and how to achieve clear, juicy, and luscious transparent enamels.    We'll shape and enamel free-form brass flowers, explore the blending of transparent enamels and finally we'll enamel a large brass angel wing. 

photo: Craftsy


Lesson 6: 
In this lesson we'll be working with liquid enamel and learn how to create a design using the sgraffito technique.  I'll also teach you how to refire a piece.  Remember, with enameling, you get do-overs! 

photo: Craftsy


Lesson 7:
I'll introduce you to the different types of decals, how to apply them and how to fire them. 


photo: Craftsy


Plus, the great part is that, even though I won't actually be in the room with you, it's almost as if I am.  You'll be able to ask questions at any point in the video.  I'll check the site daily and get back to you with the answer to YOUR question.  Not only that, but you'll be able to view questions asked by others.  

Craftsy is a very COOL platform developed by some techie guys.  They're the tech behind the gorgeous work being created by all kinds of artists.  You'll find classes in photography, painting, drawing, quilting, crocheting, knitting, jewelry-making, cake decorating, woodworking, gardening ... sorry, I need to take a breath ... but that's only the beginning!  

Tomorrow we talk more about the workings of Craftsy and how it benefits you! 

photo: Craftsy 


More enameling fun and a giveaway!

$
0
0
Hi friends, I'm sitting in my room at the Hilton Hotel near the airport waiting for our departure flight to Florida ... and reminiscing over the past week.  It started with two days in Austin.  My husband is a avid fan of Diners, Drive-Inns and Dives so dinner on our first night in Austin was at the Monument Cafe, Georgetown, TX.  The food was great, but we also enjoyed the surrounding sights and smells at the vegetable/herb gardens and market of the Monument Cafe.
Monument Cafe, Georgetown, TX
Traveling for me always includes scouting out craft galleries where I can breathe in the creative energy of local artists.   This happened during a stop at Oxidize Metal Art Gallery.  Oxidize Gallery is a tiny space! But don't be fooled.  It is filled with lots and lots of spectacular jewelry! I had an opportunity to meet the lovely jewelry artist, Elizabeth Boswell.  Guess what we talked about ... enameling!  She's currently adding color to her jewelry with the technique of powder coating. Elizabeth explained that powder coated metal would not chip, even when flexed.  She's very interested in enameling, though, especially after I told her how easy it was!  While in Austin I saw her book order come through the website!  


photo: Elizabeth Boswell

From there we headed to Guero's, a highly-recommended Mexican restaurant on South Congress Street, which is alive with craft vendors, food trucks, and people merrily buzzing throughout the unique indie shops.


Adjacent to the restaurant was a small, but bustling craft show.  Who would I run into there but Carol Bradley, an online friend and registrant in two of my upcoming classes.  Carol's enamel work is gorgeous and we had fun talking about colors and techniques. 

Two hours later would find me at an evening of "performance art" at a creative hot spot for jewelry ... Creative Side Jewelry Academy, where lots of happy campers were finishing up a fantastic metal casting workshop with Kate Wolf.  Jim and I absolutely were enthralled with Kate's hour and a half demo of wax carving.  Like all professionals, she made it look way toooo easy.  I mean, 40 years in the business has a way of doing that!  

photo: Creative Side Jewelry Academy

The following day we fled the traffic congestion of Austin and headed for Texas Hill Country and Rachel Ashwell's The Prairie.  The countryside reminded me so much of my former surroundings in  Maryland, with rolling hills and pastures sprinkled with lush green trees.  Art Retreat at The Prairie was where we would teach our students, learn from our students, and mix and mingle with other students and teachers.  What a beautiful setting to relax and learn something new! 


Carol Myers, Barb Solem, Julie Panusis, Barb Solem, Deryn Mentock, Diane Cook
Results of the Shield of Faith project, which emphasizes overfired white enamel, gives the enamel artist two necklaces in one!  Each side of the pendant is so different, you'll be able to wear it on one side one day and then reverse it for a whole different look!  A necklace for each of your personalities!  


From left to right:  Cynthia Hill, Shonna Estep, Leslie Todd, Carol Bradley, Mary Word, and Gracie Albright

Barb Solem through Vivi Magoo Presents! hosts a well-planned event at a great location, with wonderful food.  Her dedication and planning of the event gives her students and teachers the ability to relax and do what they love to do most ... create beautiful jewelry!  I would definitely do this retreat again in a heartbeat! 

Vivi Magoo Presents will be hosting Art Retreat in the Desert in Tucson,  but don't forget that Painting with Fire will be there, too!  Somehow I think Tucson is big enough for the both of us ... plus a million other people either selling or teaching!  

Now on to the Craftsy class giveaway!  All you have to do is to leave a comment at Stacey Merrill's blog, Artsnark Artifacts.  


Thank you, Stacey, for hosting this giveaway.  I've been getting great reviews from students and I particularly like how students can ask questions at any point in the video.  Their question indicates the lesson and the time in the video when the question was generated.  How genius is that?  Those guys at Craftsy have it goin' on! 

Have you been wanting to learn torch-fired enameling?  Now's the time!  

So let me ask you ... when you travel, are there particular types of places you look forward to visiting?   Have you been to an interesting place lately that just fed your soul?  I'd love to hear about it!  

Team Building

$
0
0
Last night was a team building event for 12 staff of Intel Security in Clearwater.   One of their lovely team members, Tracy, had been to Painting with Fire before and tipped them off that we might provide something different for their team building event.  Alex and Silvana conducted reconnaissance ... what could we do for their team, could we have food, would their people be interested? Jim was the lead on our end of the mission.  

We knew we wanted to do a combination of "hot and cold" ...  torch-fired enameling and sea glass wire wrapping.  Bren McCoy designed the project, organized all of the supplies and packaged them in a kraft paper jewelry box tied with a sari ribbon.  The ribbon color indicated the enamel color they be using on their enamel bead.  While this was going on at the studio, Jim was doing what he loves best, which is to cook!  He prepared a great menu for the team.  Laura and David threw themselves into the project by pricing jewelry, setting up the studio, cleaning, etc.

So the night arrives!  We're all abuzz!  Here's a "Before" photo.  


The Painting with Fire team assuring there were no burns! 


After the necklaces were assembled, the troops were rounded up for an "After" shot. 


Compare the smiles on the "After" photo to the ones of the "Before" photo!  They definitely had fun with the event, with their peers, and left with a personal creation and a good memory. 

Thanks to the whole Intel Security team for trusting us and a special thanks to Alex, Silvana and Tracy for making it happen!  

Enameling Clay ... Who Knew?

$
0
0
You know what really gets my juices flowing?  It's when I get a fabulous result from a "what the heck?" idea!  That's what happened when I decided to enamel ceramic beads. I mean glazes are glass; enamel is glass.  Made sense to me; in addition to the fact I had at lot of these ceramic beads hanging around from another lifetime.

The things I discovered ...


  • You have to give them a hefty warming-up period
  • A bead with a small hole is more likely to crack because the heat transmitted by the mandrel to that small area gives it an early dose of of concentrated heat before the rest of the bead gets warm. 
  • The beads stay "hot" longer after firing than do metal beads, so be careful not to burn yourself
  • The beauty of transparent enamels over white ceramic beads is hard to describe!
Slip cast and hand-built ceramic beads fired with Thompson Enamels 


Orange and Teal Leaves and Orange Flower fired by PWF Teacher Judi Nystrom, Sprinfield Illinois


Because it is so much fun! ... we decided to offer a workshop on making and enameling ceramic beads in The Studio at Painting with Fire.  Check it out!  We'd love to have you!

Before I go, let me ask you, what has been your unlikely discovery and is it still in use?


Let's Talk About How to Get Clear, Bright Enamels!

$
0
0
Today let's talk about the flame you get with a Hot Head torch.  This "single gas" torch has been around for about 40 years and is the workhorse of portable torches. Hooked up to a 1 lb. tank of MAP gas (propylene),   it is meant to be fired in an upright position.

Take a look at this video and then continue reading.  I hope the information is helpful to many of you who are making torch-fired enamel, but may be questioning … or reaffirming … your color results. :-)

 
There are three types of flames: an oxidizing flame, a neutral  flame, and a reducing flame.  When you light your torch, 99.9% of the time the flame will be at too great an intensity for general firing.  The flame is very loud … it's nearly roaring.  This is a reducing flame.  This bushy flame has an orange interior with yellow mini flames flashing at the edges. This fuel-rich flame has a lot of non-combusted fuel.  This extra fuel will be deposited in your beautiful enamel and turn your colors a muddy gray or brown.     

To reduce the flame intensity, turn the knob to the right. Turn, turn, that's right, keep turning.  Turn the flame down until it is nearly off; then turn the knob to left about a half a turn.  This is an oxidizing flame.  An oxidizing flame is a cool flame. It is a flame with a clear blue cone.  It will take you forever to fire a bead in this flame. 

Now turn knob to the left about one to two turns.  This is a neutral flame.  It should have a clearly defined inner blue cone with slightly bushy yellow edges.  This is the ideal flame … the one you're shooting for.  

Within the neutral flame, however, there is a reducing part of the flame, a neutral part of the flame, and an oxidizing part of the flame.  Remember, we're talking now about a flame that is set to the  perfect intensity.  Starting at the torch end,  you'll find the reducing flame.   If you move 2.5" to 3" from the torch end, you'll find the neutral flame.  Beyond the neutral flame is the oxidizing flame.  Each of these flames are useful to the torch-firing enamel artist. 

The neutral flame is where you'll find the "sweet spot".  It is where there is a near perfect balance of oxygen and fuel, which is what makes the flame hot AND clean.  This is the area with which you'll have the best relationship!  Bright colors are produced in a short amount of time.

So, when and why would we be interested in reducing and oxidizing flames? I primarily use the reducing flame to create special effects.  After I've fired the enamel to maturity (a glossy finish) in the sweet spot of the flame, I can finish the piece in the reducing flame to create a smokey haze.  Remember, the reducing flame contains non-combusted fuel. 

The oxidizing flame, which is beyond the sweet spot, is a great place for "flame annealing." Flame annealing allows you to control how quickly the glass cools, which prevents thermal shock.  For a bead with a few layers of glass there isn't a need for controlled cooling.  However, controlled cooling is essential for enamel head pins. 

Use the flame to your advantage, whether you're firing enamel onto metal, getting special effects from a reducing flame, or annealing enamel head pins.  If you have any questions, please leave them in the comments section and I'll respond.  Have a great week!  Barbara


The beauty of Liquid Enamel!

$
0
0
I absolutely love the versatility of liquid enamel!  I also love the satin surface of the fired enamel, which is very unlike other enamels. The porcelain clay in liquid enamel contributes to its buttery smooth surface.  


Liquid Enamel over Copper Pipe, Copper Mesh, and Copper Sheet


I use liquid enamel ... 

  • as a replacement for Klyr-Fire.  You can apply it to the entire piece of copper and sift 80 mesh enamel onto the surface before the Liquid Enamel dries.  This approach gives you a good foundation for other techniques
  • when I want to do sgraffito.  Sgraffito is a technique where you scratch through the unfired surface of the enamel to reveal either a different base layer of enamel or the metal beneath.  The lines of the sgraffito design remain dark as a result of the oxidation of copper during firing. Sifting colored transparent enamels on top doesn't budge the toasty brown color of the oxidized copper.  In fact, the transparent enamels can be layered upon each other to create shading and entirely new colors. 
  • when I want to accent etching. You can dip an etched piece into liquid enamel, allow it to dry, and finger sand the enamel from the high points of the etched design. 
  • when I want to preserve a very delicate material, such as copper mesh.  Because glass is an insulator, applying liquid enamel to delicate metals will protect them. 
Pictured below is "A Mother's Heart," by Kathleen Kilgore, Tampa Bay Sculptor. Welded from strips of steel, Kathleen wanted to add color.  White liquid enamel was handpainted by Kathleen on each of the strips.  Orient Red (1870) and Sunset Orange (1840) with a smattering of Raspberry (2836) enamels were sifted onto select areas of the sculpture. The heart received multiple firings.


"A Mother's Heart" by Kathleen Kilgore
  
This is a "first look" at liquid enamel.  Stay tuned for more. 


Alternative shopping sites for jewelry tools!

$
0
0
I make jewelry so I usually check out sites that sell jewelry or metalworking supplies when I need a tool.  But friend, Larry Mellgren, St. Petersburg jewelry artist, tipped me off to another way to shop.  He buys many of his tools on Ebay by searching "Machinist Tools" instead of "Jewelry Tools." He's found that he pays a fraction of the price had he bought the same tool through jewelry searches.  

Taking his advice, I searched Ebay for a digital caliper.  I was looking for a Mutitoyo, which I discovered are quite pricey.  The budget doesn't currently permit this purchase, but some darling dividers popped up on the screen.  In a recent workshop with Wendy Thurlow I admired her smart-looking 3" divider, which was easily maneuvered in one hand.  Mine, on the other hand, were big clunky things. 
  
Say hello to my new "$15 purchase," a divider made by Starrett, a USA company manufacturing precision tools since 1880  You'll notice the $58 price tag on their website. Mine even came with little covers to protect the points of the legs, which may no longer be offered by a review of their listing. 


Just to visually compare the Starrett divider with the others I own, the divider in the middle is one I bought from Eurotool.  There's nothing wrong with it, but it's unwieldy when compared with the Starrett.  The divider on the right end has some nice replaceable points, but is even larger.


The divider doesn't replace a caliper.  It is simply used for marking ... or dividing ... lengths.  For instance, you can easily mark off a strip of metal by placing one point along the edge of metal land drawing the other point along the metal; mark divisions on a ring; mark lengths of a prong, etc.  These tasks can all be done with a divider.  I'm still in the market for a digital caliper.  I'm sure I'll be checking Ebay! 


True Confessions: I was a color-phobe!

$
0
0
I know, it's hard to believe that I really disliked color ... in the past!  I used to wake up and wonder what shade of beige I would wear that day.  It wasn't until I was introduced to over-fired enamel that I became enamored! 


Over-fired white enamel features subtle color with added texture being added by copper oxides that bubble to the surface.  I was in love!


But over time, more color crept into my work ... 


Although, currently, a little less color appears  ...


Now I find that I want a BALANCE between having color that will KNOCK your eyes out and no color at all, plus now I want BLING!  But I know very little about stones because, like I said, I never liked color.  I mean, my birthstone is Diamond so I guess I could  have been working with Diamonds!  LOL!

Today I signed up for the Accredited Jewelry Professional course offered by the Gemology Institute of America.  Shane Socash, owner of David Reynolds Jewelry and Coin, can be credited with bringing this information to the students of the Jewelry Making and Repair Program at Pinellas Technical College.  AJP classes begin July 7, 2015.  I've always loved being a student.  Thank you, Shane, for sharing your information and experience. 

Silhouette Die

$
0
0
Inspiration can come from the unlikeliest place.  How about the result of cleaning out your garage? Absolutely! Some time ago I picked up this hunk of metal from a recycler.  I don't even know why or when I bought it but it sure made a great silhouette die for the hydraulic press! 

Hunka, hunka metal!


24-gauge copper over the silhouette die produced a great form, but I see this as only "the beginning" with this die.  Liquid enamel painted on the front and back with 2300 Opalescent Green sifted on top produced the "canvas." A few strokes through the liquid enamel with the end of a mandrel produced some graceful forms.  These particular pattern decals have become a favorite for background texture.  


Multiple layers usually equals rich design.  Sometimes I think we stop too soon. Keep going with color, scratch marks, decals and see what you get.

Have you ever had the experience that you stopped too soon in the design process?  I'd love to hear about it. 


An interesting use of torch-fired enamel!

$
0
0
I have to remind myself that not everyone who uses the immersion process of enameling is a jewelry maker.  Recently I received an email from Robin of The Dancing Goats saying that he bought my book and taught himself how to torch-fire enamel to be used as an accent to his spectacular turned wood.   Isn't this stunning?   I just love the enamel tide pool with the turquoise inlay!  Take a look at his etsy shop.  You'll find some really beautiful things ...


Do you use the immersion process to enamel items other than jewelry?  I'd love to feature it here. 

When "DIY" can hurt your business

$
0
0
This thoughtful post is from my daughter, Laura Lewis Albright, Manager of Painting with Fire Studio

First I would like to say that I absolutely love do-it-yourself projects. From making my own garlic olive oil to dying lace curtains (to replace the ones that my dog destroyed during her puppy chewing phase!) But when does "do-it-yourself" become do-it-inferior?  Maybe a better question is, "When a company or individual gives you an idea or teaches you how to 'do-it-yourself,' how do you show your support of that small company or individual?" 

I will admit that there are times when I've picked up Elmer's glue from the grocery store to make my own "Modge Podge" instead of going to my local art supply store. But you know what? Most of those times I couldn't get the right consistency and I didn't feel good about not supporting a small business, like the Art Supply Store across the street from our studio. 


I know the purpose of do-it-yourself is to be more cost-effective and experience self-gratification for a job well done.  However, when does that come at the cost of quality?  For example, in our small city of Saint Petersburg, we have a specialty olive oil shop. My husband and I love to garden and are growing garlic. So, of course, we want to try making our own garlic olive oil :-)

It would be very easy for us to go out to our local super center or grocery store and buy an inexpensive brand, but we like to support the business that gave us the idea!  To show our support of Kalamazoo Olive Company, this is what we do. We buy one of their simple olive oils that has no zest or extra pizzazz.  We can take James' great olive oil and spice it up ourselves, while saving a few dollars and supporting a small business. Voila!  I feel good about supporting the individual or small business that was generous with their knowledge and ideas while still being able to do it myself.  

For our family, we see teaching and, hopefully, the inspiring of others to "D-I-Y" as our calling in life. We truly admire and appreciate our customers, friends and those who inspire us! We appreciate their support so that we can continue to do what we love to do which is to ... you got it ... teach and inspire others.  Through their support, they give us a reason for our calling.

Sometimes it may require a little extra effort, but it can be so worth it for all! 

Please share if you love do-it-yourself projects and have a calling or desire to support creative individuals and small businesses. 


Article 0

$
0
0

New Classes:
Lost Wax Casting & Metalworking I & II

In the 3-day Lost Wax Casting Workshop, you'll learn this age-old art that dates back to 4500 BCE.  You'll participate in creating your own wax jewelry or component pieces, attaching them to the "tree," and casting them in sterling silver.

The Painting with Fire Team has been enjoying casting organic pieces as a part of a ring.  A pistachio shell on top of a ring with 2410 Copper transparent enamel in the interior is our new favorite. One of the wonderful things about cast jewelry is that you can eliminate solder joints, which prove to be somewhat problematic when enameling pieces.  I find this to be a very big deal! 

Casting offers options for creating jewelry that would be all but impossible using fabrication techniques. You'll experience the ease of carving, filing and polishing wax, which will then be transformed into sterling silver. 
The cast tree! Look at all the pieces one tree can hold! It's amazing!
Let's shine it up :-)
We have also added Metalworking I & II to our class schedule as well as other new project workshops.
Please register here and pass along to a friend.  

Sources of Inspiration

$
0
0


Have you ever gazed at the burning embers of a fireplace and thought, "I wish I could get my enamel (or ceramic glaze, or textile surface, etc.) to look like that? 


These earrings by Lynn Burcher of Gilded Lily Glass on etsy is a perfect example! These made-to-order earrings "smolder with red and copper dichroic glass." Lynn also makes a matching pendant.  And, guess what, we're coming into that time of year where fireplaces will be lit ... even in St. Petersburg!  

https://www.etsy.com/listing/117721399/burning-embers-clip-on-earrings-fused?ref=market

You can get inspiration from the work of other artists, too. I'm drawn to the richness of the work of Janet Loomis of Anvil Artifacts, where the edges of painted tin appear to have been lovingly rubbed to reflect the patina of age.


When I was writing my second book, I thought, "How can I recreate that look of wear?" "I'm Distressed" a project from "Mastering Torch-Fired Enamel Jewelry" is my stab at it.  


Here are the steps I took to make these earrings. You could also bump it up a notch by adding painted detail through the use of acrylic or liquid enamels!


I'd love to hear about some of your favorite sources of inspiration and would be happy to post them on my blog as a follow-up to this post!  This could be fun! All the best, Barbara

You can find Janet's lovely work here:
www.anvilartifacts.com
www.anvilartifacts.etsy.com
www.amazon.com/handmade/anvileartifactsdeux


Hello, friends!

$
0
0
It's been a long time, but Facebook doesn't give me enough room to really write!  I miss writing ... not enough to write another book ... but enough to get my blog going again!

Family is so important.  People ask me, "It's great that you all live near one another.  How did not happen?" Well, it wasn't an accident, let me just say that!  From the time Laura was 12 years old she complained of Maryland winters.  She would say, "When I grow up, I'm going to live some place warm." This was not a single complaint mind you.  This happened every winter.  I'd hear the familiar refrain many times throughout the cold, dark Maryland winters, something not easily forgotten.

So, when it came time for Laura to transfer to a four-year university, I said, "If you want to live some place warm, why don't you consider finishing your degree in a warm climate?" Then I put on my thinking cap, "Hmmm, where would Jim and I like to live?" He did his psychology internship in the mid '70's in Miami, but so much had changed there.  When we lived in Coconut Grove, it was filled with creative people who owned and operated the shops in the village ... instead of Banana Republic and Gap!

St. Pete's sense of community, affordable housing, arts and culture, and beautiful water has been a great choice for us.  We bought a home for Laura to live in while finishing her degree in Finance at USF.  The difference between out-of-state and in-state tuition nearly paid for the monthly mortgage payments.  We moved Painting with Fire to its location on Central Ave and David, our inventory specialist, came with it.  Laura graduated from college, she moved out of the house, we moved in!  It was like synchronized swimming, very well orchestrated, with God's hand moving us as if we were marionettes. Life is good! 

A birthday celebration is all the sweeter when you're with family.  Jim graduated from his 66th birthday (which he called being "two-thirds evil") to 67.  His interest in music was re-emerging.  He figured out how to create a play list on Amazon through his Prime membership. :-)   Songs we grew up with by Creedence Clearwater, Gordon Lightfoot, Janis Joplin, Jimi Hendrix ... it was quite the mix.

Then the light bulb went on ... Jim used to love to play the mandolin.  When I first met him he serenaded me with Quicksilver Messenger Service's "Who Do You Love?" I was impressed!


His mandolin was so tired looking and had a crack.  It was barely holding it together. David, our musician son, picked out a beautiful mandolin for his father.  Without any thought, Jim placed the mandolin here ...   Could it be a more perfect setting?  


Laura and Matt, our daughter and son-in-law, Mr. and Mrs. Green Thumb, brought plants.  Here's the little vignette they created on the porch.  This is only a sample of what they've done in the yard since Father's Day! I feel as though they're landscaping the yard a little bit at a time! 


It was the perfect day.  I'm now babysitting the plants so they won't die in his brief absence. I'm really not a good babysitter! 

I'd love to hear about special moments you share with  your family.   

See you soon!  Hugs, Barbara

The "little-known" parathyroid gland!

$
0
0
Hi friends, I'm writing this in the hopes that my experience can save you from the devastating effects of an often over-looked disease.  

Are you tired, irritable, and depressed? Do you feel older than your chronological age and have "foggy brain?" Have you suffered from kidney stones?  How about constipation, GERD, and other digestive problems?  If so, you might have Primary Hyperparathyroidism.  Yes, it's a mouthful but it describes these teeny, tiny  "punks" that are robbing you of full and happy life.  

If your blood labs have shown high calcium levels, there's a 99.9% chance you have a benign tumor on one of the parathyroid glands. Post-menopausal women are at higher risk.  If you've never heard of parathyroid glands, you're not alone. We have four and they rest on the thyroid. They control the amount of calcium your body produces.  If your calcium blood levels are normal, it means that your parathyroid glands are taking a nap.  If your levels are high, it means they are fully engaged but should be napping.   

So, what is a high calcium reading?  For someone in their 50's or 60's it would be in the 10's. In 2014, my calcium level was 10.5.  My doctor never addressed my high Calcium level.  I noticed it but thought it was good.  I thought it meant I would have strong bones, which is so laughable to me now that I realize the devastating effects of high calcium.  

In 2017,  I started seeing a new PCP, Dr. Gigi Lefebvre. Besides having a very pleasant demeanor, she's very thorough and methodical during patient visits. She doesn't miss a thing.  At the end of the visit, she hands you a copy of the notes she took during your visit.  

My first blood labs with Dr. Gigi revealed high calcium of 10.7.  I had two doctors prior to Dr. Gigi who didn't notice or address my high calcium levels. Dr. Gigi referred me to an endocrinologist who ordered more tests with the same results, normal PTH and high Calcium. He said, "You can wait and see ... or you can go to the Norman Parathyroid Center (NPC)  in Tampa." By the time of my visit with the endocrinologist, I had already researched the Norman Parathyroid Center. They specialize in parathyroid surgeries.  That's all they do. People from all over the world come to the Center and here I am living across the bridge.  I thought, "Hell no! I have three years of blood labs showing high calcium levels, I don't have to wait any longer." If it had not been for Dr. Gigi, I would still be suffering!

I filled out the NPC online questionnaire. They received my records from Dr. Gigi within three days. Dr. Daniel Ruan, who would be my primary contact on my three-member surgical team, called me on the phone while driving to his vacation destination. In short, he said I had primary hyperparathyroidism and the only cure was surgery.  I said, "What's the next step?  Do we meet?" He said, "I'll meet you on the day of surgery." In the meantime, the surgical appointment was set up and I started receiving informational emails from their supportive staff.  

This is the ugly thing they removed from my neck 6 days ago!


My gland should have been the size of a grain of rice not the size of a kidney bean! They use a specialized scope to detect the amount of hormone the gland is producing.  Normal limits are between 30 and 80.  The reading of this tumor was 1709! 

If you've made it this far, what you've read is a patient's explanation of hyperparathyroidism.  If you want to hear the explanation by my surgeon, an expert in the field, click here.  You'll hear Dr. Danial Ruan explain this often overlooked disease in an easy understandable way.  Please don't let the day go by without taking a look at your last blood labs!  If you have any questions, please leave them in the comments.  Here's to good health! 


47th Wedding Anniversary!

$
0
0
I hate it when the time changes because my sleep gets interrupted!  It's 4:45 am! So, I'll tell you a story.  I met my husband through a work friend, Maria Cordone, on February 22, 1971, the freezing night of George Washington's Birthday.  It was about 7 pm when we arrived at Maria and Doug's apartment and it was love at first sight!  We were engaged after two weeks ... but we allowed ourselves a yearlong engagement for possible reconsideration! Ha!    

Our wedding day, March 11, 1972, was cold and blustery.  I wore a white mini-skirt and matching top I had made from the NEW fabric that didn't need ironing! It was a polyester double-knit probably still survives at a landfill somewhere. Fr. Petrini officiated the wedding ceremony before a few friends and family at St. John the Baptist De La Salle, Chillum, Maryland.  
St. John the Baptist De La Salle
The reception was at our apartment in Queens Manor Gardens, Mt. Rainier, MD, a few blocks from the Washington, DC line. 

Our apartment building
  

We had been planning to marry in May, but when the apartment became available in February, we moved our wedding up.  We were practical people ... and neither of our families had any money to host a wedding and reception, which made it quite easy to change the wedding date.  Jim's mother had been widowed a year earlier, leaving 6 children without a father and my mother was a single mom raising 4 kids. 

We managed to get our apartment through the influence of my grandmother, who also lived there.  It was unspoken but understood that you needed a reference to gain occupancy.  The management discriminated against young people and minorities.  Our $112 a-month rent got us a 2-bedroom apartment with beautiful parquet floors in a solid early 1940's building.  Current rent for our apartment is $1400.  

Our building had four apartments.  I didn't know much about two of our neighbors, but our downstairs neighbor, Mr. Tinsley, worked at the local funeral parlor.  When I told him that my wish was to be cremated when I died, he was aghast and described what sounded like the fires of hell!  This didn't bother me a bit.  I found it preferable to being buried in the dark, moist ground with worms.  I mean, I shouldn't care ... presumably I'll be unaware of where I am! I've since made my children swear to uphold my cremation wish, however, because I secretly suspect a traditional burial would suit Jim better. 

In 1971, Jim entered his first year of the Ph.D. Clinical Psychology Program at The Catholic University of America (est. 1887).  Coincidentally, this was a school he said he would never attend because its spooky and foreboding architecture.  He also said that he would never work with children in his psychology practice but which became a focus of his career. 

The Catholic University of America, Washington, DC

I was working as executive secretary to George Kourpias of the International Association of Machinists and Aerospace Workers at 1300 Connecticut Avenue, N.W., Washington, D. C.  Mr. Kourpias would ultimately become President of the Union.   

International Association of Machinists Building


Since Jim got home before I did, he started doing some of the cooking.   I wisely complimented him on his chili.  Little did I know it would become a weekly staple! But, he branched out to Steak Diane and other tasty dishes.  Listen, I really don't enjoy cooking and hate going to the grocery story, so I was thankful.  To this day, he does all the grocery shopping and cooking.  On the rare occasions that I go into the Publix with Jim, they smile when they meet the mystery woman ... since Jim knows the cashiers by name ... and probably knows the names of their kids and their birthdates.   

July, 1973 saw us leaving for Jim's internship in Miami.  It was either Boston or Miami, and we wisely chose Miami. 

We traded in my 1969 Plymouth Barracuda

for a Volkswagen 411 ...


Miami was the scene of many fun times.  We moved into a former hooker motel that had been converted to one-bedroom and studio apartments at the exclusive address of 2665 S. Bayshore Drive, Coconut Grove, FL.  In our bedroom, our full-size bed nearly went wall to wall. Talk about tiny!

Many weekends were spent snorkeling at Long Key State Park, sleeping in a tube tent.  It is currently described as an "emergency" tent.  Heck, we didn't know that or we would have splurged for something much nicer!  No, this was our go-to shelter.

Tube Tent ... which we used on our many camping weekend at Long Key State Park 
The social life at the apartment complex was wonderful.  We all moved in at the same time and became fast friends, with people the likes of Leapin' Larry Greene, who was behind the camera filming for CBS, etc.  Unfortunately, Larry was  killed in a US Navy helicopter accident flying over the North Arabian Gulf near Iran, in September 2002, shooting a story for CBS.  

So, it's now 6:30 am.  We're planning a trip to Anna Maria Island with our friends of 43 years, Jan and Tom Moskitis.  We were neighbors in Clinton, Maryland, where we both become homeowners for the first time. 

This has been a meaningly walk down memory lane for me.  Since I seem to be blogging about once every two years, we might have to wait for my 50th anniversary for the "rest of the story," as Paul Harvey would say.  

If you've hung in 'til the end, thanks for allowing me to share part of my life with you!  Barbara

 
Viewing all 78 articles
Browse latest View live


Latest Images